Okay, so you may not have both an Ipod and a PSP and have your entire music collection stored on a Linux PC. Those who do would know all about the joys of transferring all your MP3s from your Linux box over to your iPod – I’ll save that rant for another day.
The problem I’ve encountered is this – those MP3 files with a picture of the album cover embedded in it looks perfectly okay on the PC running Linux. You copy it to a Windows PC, no problem. You transfer it from your Windows PC to your iPod using iTunes, and it looks great (well, most of the time – I already said I’ll save that rant for another day).
You drag the same mp3 to your PSP, and next thing you know, your lovely album art turns from this:

into this:

I googled high and I yahooed low, and I couldn’t find the answer anywhere.After weeks of headbashing, I *think* I may have just found the solution. I’ll sum up the quick answer right here :
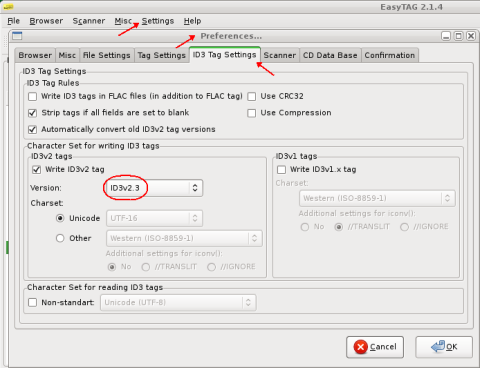
- use ID3v2 2.3 NOT 2.4
- album file name must NOT have a description.
In trying to get a simple picture to show up on my PSP, I’ve learned more about id3 tags than I care to. To learn more about the idiosyncracies of id3 tags, go here:
To show you what I’ve done to resolve this issue, here’s how I did it. As of this writing, the tools I am using on my Ubuntu Linux (version 8.10) desktop:
- EasyTag 2.1.4
- id3v2 0.1.11
- eyeD3 0.6.16
To get all these apps, just do:
sudo apt-get install easytag eyed3 id3v2
I initially set up my EasyTag to use id3 tags v2.4, thinking the latest must be the greatest. Well, it ain’t. Change the default settings back to 2.3. Start EasyTag, Go into Settings, Preferences, Select the ID3 Tag Settings tab, and choose to write ID3v2 tag version 2.3

I had ripped the songs from a CD originally and downloaded a picture of the cover and associated it with each song using EasyTag. When I run eyeD3 on the files, i.e.
eyeD3 -v *.mp3
this is a sample of what I see:
12 Karen Carpenter – Last One Singin’ the Blues.mp3 [ 5.58 MB ]
——————————————————————————-
Time: 03:28 MPEG1, Layer III [ 192 kb/s @ 44000 Hz – Stereo ]
——————————————————————————-
ID3 v2.4:
title: Last One Singin’ the Blues artist: Karen Carpenter
album: Karen Carpenter year: 1996
track: 12
FRONT_COVER Image: [Size: 26120 bytes] [Type: image/jpeg]
Description:
——————————————————————————-
ID3 Frames:
<Title/songname/content description (TIT2): Last One Singin’ the Blues>
<Lead performer(s)/Soloist(s) (TPE1): Karen Carpenter>
<Album/Movie/Show title (TALB): Karen Carpenter>
<Recording time (TDRC): 1996>
<Track number/Position in set (TRCK): 12>
<Attached picture Frame (APIC)>
Note that it still shows ID3v2 version 2.4 and although the FRONT_COVER image does not have a Description set, it still shows up corrupted on the PSP. To fix it, I had to physically strip off the image from all the MP3 files, save it, and then re-add it. I discovered that if I were to just delete and readd without the intermediate step of saving it first, the results were inconsistent. Did I mention how much I hate the non-standard implementation of ID3 standard?

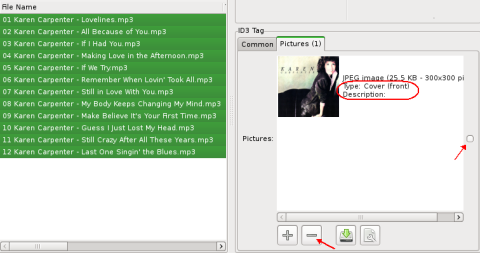
Highlight all the files that have the ‘corrupted’ picture associated with it, click on the [-] block at the bottom as indicated by arrow (this removes the picture, and then click on the blank circle on the right indicated by red arrow. This applies the deletion of picture to all the files highlighted on the left. Make sure you click on the File, Save Files to write these changes. Once this is done, if you run the eyeD3 command again, you will see that the FRONT_COVER Image tag should now be gone.
12 Karen Carpenter – Last One Singin’ the Blues.mp3 [ 5.58 MB ]
——————————————————————————-
Time: 03:28 MPEG1, Layer III [ 192 kb/s @ 44000 Hz – Stereo ]
——————————————————————————-
ID3 v2.3:
title: Last One Singin’ the Blues artist: Karen Carpenter
album: Karen Carpenter year: 1996
track: 12
——————————————————————————-
ID3 Frames:
<Title/songname/content description (TIT2): Last One Singin’ the Blues>
<Lead performer(s)/Soloist(s) (TPE1): Karen Carpenter>
<Album/Movie/Show title (TALB): Karen Carpenter>
<Year (TYER): 1996>
<Track number/Position in set (TRCK): 12>
Note too that the ID3 version is now v2.3.
Add the album cover back to the files again. Select all the files as shown above, now click on the [+] button at the bottom.
A dialog box will come up to ask you to choose the album art. Once that is done, make sure that the cover type is Front, and that the description is empty. By default, the description field is filled with the name of the file you just inserted. To remedy this, click on the Settings button and make your changes.

That’s the one on the right with the wrench.
Apply this change to all files highlighted by clicking on the small circle on the right. As before, make sure you click on the File, Save Files to write these changes.
Run eyeD3 again just to doublecheck:
12 Karen Carpenter – Last One Singin’ the Blues.mp3 [ 5.58 MB ]
——————————————————————————-
Time: 03:28 MPEG1, Layer III [ 192 kb/s @ 44000 Hz – Stereo ]
——————————————————————————-
ID3 v2.3:
title: Last One Singin’ the Blues artist: Karen Carpenter
album: Karen Carpenter year: 1996
track: 12
FRONT_COVER Image: [Size: 26120 bytes] [Type: image/jpeg]
Description:
——————————————————————————-
ID3 Frames:
<Title/songname/content description (TIT2): Last One Singin’ the Blues>
<Lead performer(s)/Soloist(s) (TPE1): Karen Carpenter>
<Album/Movie/Show title (TALB): Karen Carpenter>
<Year (TYER): 1996>
<Track number/Position in set (TRCK): 12>
<Attached picture Frame (APIC)>
Voila! That’s it.
Update: More PSP stupidity (and Sony wonders why the PSP doesn’t sell well…)
- excessively large album art seems to make the PSP not display the pic – use jpegs smaller than 500×500 to be safe
- if you have a file called something.m3u, remove it or the PSP will show your folder with the name of the m3u file instead, and ZERO songs in it, even if all the tracks are in there
- and, of course, the usual restriction on folder depth :you can’t have your MP3s two levels deep… i.e. /MUSIC/AlbumName is cool, /MUSIC/Album/Name/CD1 is not.


